The last time we saw the Hawkeye Community College C10, the students were shortening the frame and upgrading the front and rear of the truck to a complete QA1 suspension. The frame is now out getting ready for powder coating and the students have turned their attention to giving a body makeover to the panels of the truck. While this Chevy’s body is in relatively good shape with only minimal areas of rust, bringing it back to a better-than-new condition will require a lot of work, some new parts, and instructor Terry Van Dyke’s constant supervision.


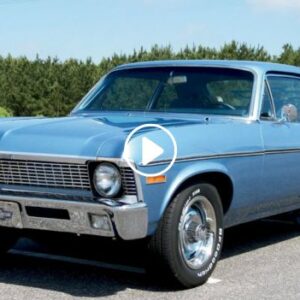
The 1972 Chevy C10’s body is in surprisingly good shape when you consider the number of winters it has endured. The Hawkeye students are learning first-hand how far “surprisingly good” is from perfect.
Because this is a custom build, there will be numerous variations from the way this truck left the factory. The students dealt with a litany of spot welds to remove the factory firewall panels that were chock full of unnecessary holes. Since this truck will not bear all the chrome trim that it once wore, many of the holes were welded shut at this time.


Students spent some time removing all of the spot welds so the smooth firewall sections could be welded in place of the factory ones.
When it came time to address the bed of the truck, a complete assembly from Auto Metal Direct (AMD) saved a lot of time repairing panels that had been unmercifully beaten over the years. The beauty of Chevrolet’s truck bed is that it bolts together, so any old panels can easily be replaced.


A complete bed was sourced from AMD and assembled for trial-fitting to the body and shortened frame.
Modern paint systems are designed to work in conjunction with other parts of the same system. Mixing and matching old and new products is not a good way to start the foundation for any paint job. The team set out to remove all the layers of paint and rust that had accumulated on the surface of the truck’s cab over the years. There are many ways to achieve this, and the students used various grit of sandpaper to safely work their way down to the fresh metal.


The goal is to make this C10 one of the finest rides in the country and those factory production gaps will never allow for that. Terry used this moment to illustrate how to make the perfect gaps around items such as the custom Chad Criss Design taillights. Now is the time to make these major modifications that will have a lasting effect on the vehicle’s finish quality.
Sanding also gives the students time to observe the surface of the metal for any imperfections that will need to be dealt with for that super smooth finish. The students also got a lesson in attention to detail, as instructor Terry helped them understand the difference between production-line body panel gaps and getting those perfect body lines and gaps that will set this truck apart on the show field.


While the old tailgate gaps were good enough to keep hay bales from falling out, the judge’s eye will require a much tighter tolerance when completed. The students spent time ensuring that even the tailgate fit as well as possible before proceeding. You can already see how touches like the custom rear taillights let everyone know this isn’t your typical truck.
The Foundation For A Great Finish
After all the old paint is stripped off of the panels, the students began replacing any rusted panels and correcting any gaps that were not at the level intended for this build. They also handled any welding of repair panels or welding up all the trim holes that would not be used when the truck comes back together during this time.


The truck’s body came apart once again to give everything the final once-over before epoxy priming everything.
The truck’s body panels were installed and then removed numerous times during the body makeover to ensure that everything was fitted, and sufficiently cleaned before everything was sprayed with a new coat of epoxy primer. Epoxy primer not only seals the surface from contaminants in the air but provides a corrosion-resistant layer that will allow Hawkeye students to start their bodywork using linear blocks and 3M body filler.

Total disassembly is the only way to ensure that all surfaces are coated evenly. This will allow the students to find any high, or low spots in the body panels so they can be smoothed for a perfect finish.
Firmly attached to the raw steel, the epoxy primer will also keep the upper layers of paint from peeling or wrinkling and will give them a uniform foundation to find any flaws in the surface of the metal. The students are learning that the only way to get a great finish is to start with a proper foundation.


Hand-sanding the panels with linear block sanders is a team effort. Keeping a clean work environment is also important to ensuring a quality finish once the truck is completed.
Each panel was then scrutinized by hand with a thin layer of body filler and a linear sanding block. Compound curves and long, flat body lines are the breeding grounds for dips and undulations that will show up in an otherwise perfect shine. The team of students spent a fair amount of time fishing out any of these areas during the body makeover to ensure that imperfections were located and dealt with accordingly. After roughing in the body panels, the students will bolt them back on the truck for a final panel-to-panel blocking using Linear Blocks to get the body straight.


Ensuring a proper fit and super-straight body lines is a constant effort. When this truck is finished, the goal is to have the body as straight as a ray of sunlight.
As the truck continued to come together, gaps and body line alignment became more crucial to the project. With the body and the bed both situated on the frame, any changes or adjustments needed to be made before work could continue.

As we conclude this installment, you can see that the truck is coming together nicely and all the time and effort put into the project by the students is really starting to pay off. Terry summed it up nicely by saying, “I hope this project can give my students just a taste of what can be done with the right learning, techniques, and resources.” We think that is exactly what will happen as we see this awesome 1972 Chevy C10 come back together, better than ever before.